

This post is also available in:
![]() Português
Português
The Ultimate BitMEX Guide: We want to demystify the BitMEX Universe. This BitMEX guide is the first stop for anyone who wants to hop on the BitMEX train and learn how to use this great FinTech platform. Going to BitMEX is not easy for beginners, especially if you don't come from Forex trading or other derivatives offering leverage; on top of that, BitMEX has some specialties you should know about. We detail this in our BitMEX Guide. We at SmartOptions chipped in, added our secret sauce for you, and explained the common pitfalls you may encounter on the platform. Let's dive into it and learn how to ride that beast.
BitMEX, short for Bitcoin Mercantile Exchange, is a platform designed for advanced currency traders. Experienced traders can get up to 250 times leverage in contracts and shorting, which increases the chances of making it big profits or losses.
Table of Contents (click to expand)
The BitMEX Guide
Advanced traders are more comfortable with higher risk, and that’s why this platform is so popular with them.
BitMEX only trades in Bitcoins, which means profits and losses are made in Bitcoin even if you use an altcoin to finance trading. This platform isn’t beginner-friendly and is not suitable for everyone. Check out our crypto beginners guide for an easy start.
BitMEX guide reminds us: invest only what you can afford to lose!
Let’s take a look at the trading interface in our BitMEX Guide.
This interface might be cluttered for some, and we suggest removing any information you don't use. We like it pretty simple, with just the charts and the positions box there. Don't fall in love with the order books too much, especially newbies that can be distracted by fake walls.
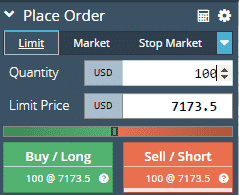
This is the board to set up your position:

Contract
By placing an order on Bitmex, you are buying their “contract”, not BTC. Each contract is worth $1. As you can see in the picture, the quantity is $100. This quantity is the BTC contract. $100 quantity equals 100 contracts.
Long/short
What does “go long” mean, and what does “go short” mean?
When a trader is in a long trade, they have bought a “Buy” contract for an asset and hope the price will go up.
BitMEX Guide: Crypto traders often will use the terms “buy” and “long” interchangeably. Similarly, some trading software has a trade entry button labeled “buy,” while others have one labeled “long.” The term often is used to describe an open position, as in “l am long in Ripple,” which indicates the trader currently owns tokens of Ripple.
Traders often say they are “going long” or “go long” to indicate their interest in buying a particular asset. If you go long 1,000 EOS tokens at $10, the transaction costs you $10,000. If you are able to sell the coins or tokens at $10.20, you will receive $10,200, and net a $200 profit, minus commissions. This type of scenario is preferred when going long. The alternative is for the price to drop. If you sell your holdings at $9.90, you receive $9,900 back on your $10,000 trade. You lose $100, plus commission costs.
When you go long, your profit potential is unlimited because the asset's price can rise indefinitely. If you buy 100 tokens at $1 each, those tokens could go up to $2, $5, $50, $100, etc. Your risk is limited to the token going to zero. In the example above, the largest possible loss occurs if the token price falls to $0, resulting in a $1 loss per share.
BitMEX Guide: Day traders in short trades sell assets before buying them and are hoping the price will go down.
They realize a profit if the price they buy it for is lower than the price they sold it at. “Shorting” is confusing to most new traders, since in the real world we typically have to buy something before we can sell it. In the financial markets, you can buy and then sell or sell then buy.
Day traders often use the terms “sell” and “short” interchangeably. Similarly, some trading software has a trade entry button labeled “sell,” while others have one labeled “short.” The term “short” is often used to describe an open position, as in “I am shorting XLM,” indicating that the trader currently holds a short position in XLM. Traders often say I am “going short” or “go short” to indicate their interest in shorting a particular asset.
Similar to the example of going long, if you go short 1,000 EOS tokens at $10, you receive $10,000 credited to your account, but this isn't your money yet. Your account will show that you have – 1,000 contracts, and at some point, you must bring that balance back to zero by buying at least 1,000 tokens. Until you do so, you do not know what your profit or loss on your position is.
If you are able to buy the contracts at $9.60, you will pay $9,600 for 1,000 tokens. However, you originally received $10,000 when you first went short, so your profit is $400, minus commissions. If the token price rises and you buy the tokens back at $10.20, you pay $10,200 for 1,000 tokens, losing $200 plus commissions.
Understanding Short Positions and Order Execution
When you go short, your profit is limited to the amount you initially received on the sale. For example, if you sell 100 tokens at $5 each, your maximum profit is $500 if the token price falls to $0. Your risk, though, is unlimited since the price could rise to $10 or $50, or more. The latter scenario means you would need to pay $5,000 to buy back the tokens, resulting in a $4,500 loss.
Shorting, or selling short, allows professional traders to profit regardless of whether the market is moving up or down, which is why pro traders usually only care that the market is moving, not which direction it is moving.
Do you see the white bar below the sell/short box? When that bar is full, your position will be filled immediately upon placing the order, and vice versa for the buy/long box. On a side note, if your order is filled immediately, you are a fee taker, not a fee maker. You are a fee taker when you “take” the price set by the exchange, and a fee maker when you place a limit price. For more info on BitMEX fees, click here for the nestnet.
BitMEX Guide: Profit
This is the formula for calculating the profit on BitMEX when you open a position. This formula can be applied to both short and long positions. You can also use the BitMEX calculator to compute the profit/loss and liquidation price.
Profit = (1/ entry price – 1/closing price) * position size.
Example: You open a long position at $6000 with 1000 contracts. Then the BTC price rises to $7000.
Profit = (1/6000 – 1/7000)*1000 = 0.02 BTC
Cost
This is the expense to open the position. The cost can be reduced by increasing leverage. The higher the leverage, the lower the cost, thus pushing the liquidation price closer to your order’s price.
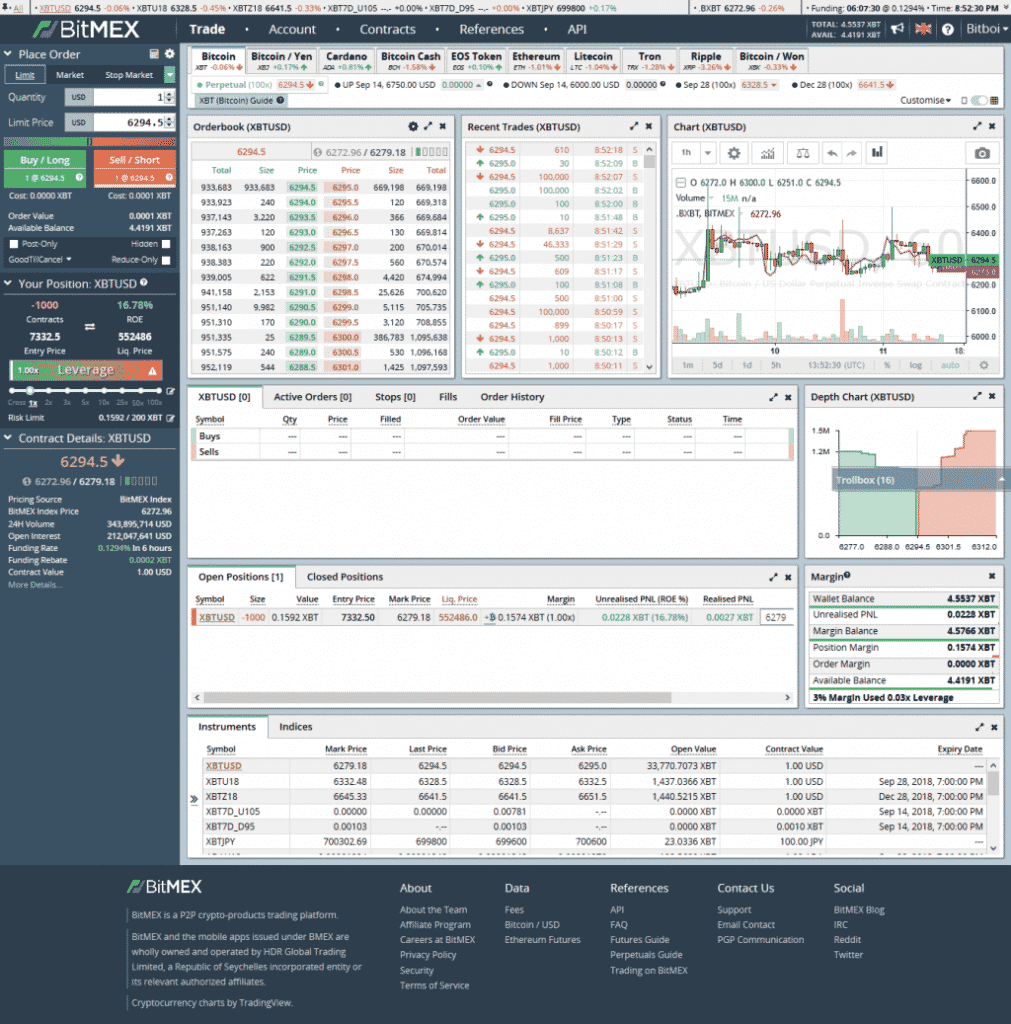
Hidden
When you tick in this box, your order will be hidden instead of appearing in the order book. You can input the amount of contracts you want to buy.
Post-only

The post-only limit order option ensures the limit order is added to the order book and does not match a pre-existing order. If your order matches a pre-existing order, your post-only limit order will be canceled. This is useful if your entry price is not yet in sight; you are basically casting out your line to fish an upcoming order that does not yet exist in the order books. Once it is there, you can catch this fish immediately and get your order executed with the highest possible maker rebate.
Reduce-only

By using a reduce-only order, you will not be able to spend more than you have in your position.
Example: you open a 300 XBT long position at 6100, then calculate a take-profit at 6200 and want to add another 300 XBT to the position.
However, because you have already ticked the reduce-only box, the short order will not be executed more than 300 XBT. Under some circumstances, it can be helpful to uncheck the reduce-only checkbox – for example, you expect a certain price to be reached, followed by a reversal/drop. This can be especially interesting when the charts show much wick action.
Example: You expect the price to reach the resistance at 6,800 followed by a hard rejection. You own 1000 contracts long to the price target of 6,800. If you want to turn your long position into a short position at this price, place a sell order for 2000 contracts and uncheck the Reduce-Only checkbox. This is called a buy-sell order and will result in a new short position as you sell 1000 contracts more than you own. With the box ticked it would ignore the additional 1000 contracts and just sell your existing 1000 long contracts.
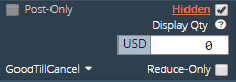
GoodTillCancel
When you click into this box, 3 different types of commands will appear.
GoodTillCancel allows you to fill your position separately. Example: you want to buy a long position with 1000 contracts at 6000, but there are only 500 contracts in the market. Your position will be filled with 500 contracts without closing your order. ImmediateOrCancel allows you to partially fill your position. Any unfilled contract will be canceled when you choose this feature. FillOrKill allows you to fill your order immediately only if there are enough contracts in the market for your position.
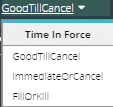
Bitmex Guide: LEVERAGE
This is the most important part of this guide. Please understand it carefully before trading. In theory, leverage allows you to borrow money from the exchange to increase your position size. Example: you borrow $1000 to increase your position size from $1000 to $2000, then return the loan after you close your position. When BTC goes up 10%, you will also make more profit, and vice versa.
Example:
No leverage profit: $1000 * 10% = $100
Leverage profit: $2000 * 10% = $200
However, Bitmex is different. By using leverage, you won’t open the position with a larger size, but you'll open it at a lower cost. As you can see on the left side, the cost to open a position is much higher compared to the right side, thus minimizing your fees. However, the higher the leverage, the closer the liquidation price to your limit price. Therefore, we recommend you use 2x or 5x leverage when you first start trading. Otherwise, remember to set your leverage to 1x. Cross-leverage can reach 100x leverage and is very dangerous if you don't know what you are doing. In fact, cross-leverage burns newbie accounts day by day.
BitMEX Guide: Funding rates
On the top right of the trading interface, you can see the funding rates.

Understanding the funding feature on Bitmex is difficult. Funding rates can be positive and negative. Basically, you can say a negative funding rate pays you interest if you are long and takes equity from your position if you are short. Versa vice with a positive funding rate. The interval between each funding is 8 hours; this is the point in time where the account becomes charged and credited.
Limit price
Let’s move on to the limit price. What is it? The limit price is the price at which your position will be filled once the market price reaches it. In the picture above, you can see three tabs for 3 types of orders: limit, market, and stop-market. We will explain each type of order one by one. Important to know is the underlying concept: If you place a limit order, it won't be executed immediately (in most cases), but only once a specific price is reached. This ensures the fee rebate. A market order incurs much higher fees and is executed immediately against the order book. So if trader A has a limit sell order at 6456K and you place a market buy order at that price, he sells his shorts against your longs.
Limit order
What is a limit order? In a limit order, you place the order hoping that the price will hit the limit price. When it hits the limit price, your position will be filled. However, it depends on the market whether your order is fully filled. In this case, you are a fee maker, not a fee taker. Placing limit orders incurs a very low fee, which is why it is favored by traders.
Market order
What is a market order? As you can see, in comparison to a limit order, you cannot set a limit price, which means if you click on buy or sell market, the order will be filled immediately In this case, you are a fee taker, not a fee maker, because you did not “make” the price, you “take” the price which is set by the exchange. For every market order, the fee is much higher compared to a limit order. Therefore, we recommend you use a limit order instead of a market order. Market orders are mainly for FOMO or when you see a major breakthrough and want to get in as fast as possible.
Stop market order

The stop market order is used for setting a stop-loss. Example: You have a long position at $ 6000 and want to set a stop-loss at $5990. Open the stop market order, type in the stop price 5990, an order will be opened and filled at the same time when the market reaches that price. On a side note, close on the trigger is an advanced feature of Bitmex. When you check this box, all amounts in your position and open orders will be reduced and canceled upon triggering.
Stop-limit order
Bitmex Guide
A stop-limit order is similar to a stop market order. However, there is one difference: the stop price triggers the limit price. Example: you set a stop price at $6000 and a limit price at $5900 for your long position. The $5900 order can only be triggered once the market price comes down to $6000. Here, the order becomes activated and visible in the order book (if you have “hidden” unchecked). From now on, other traders can pick up your order. However, setting up your stop-loss is not advisable and is a common pitfall. During rapid price movements far below the stop-limit order, it is likely that your order will not be filled, which means your stop-loss is useless. Hence, we recommend using the (more expensive) market orders for your stop-loss, as the likelihood of being filled is much higher.
Trailing stop
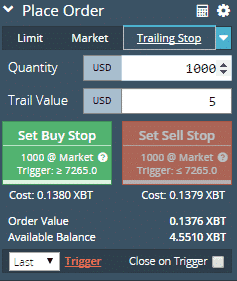
In other words, it’s a price interval. By using this type of order, you can protect your profit. Example: You open a long position at $6000; BTC rises from $6000 to $6010, and a stop-loss order will be placed at $6005. However, if it keeps rising, the stop-loss order will be increased accordingly and will always be set $5 below the current price.
Take profit-limit/ Take profit market
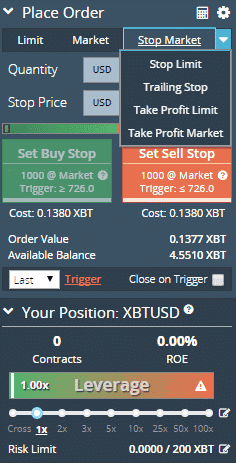
These 2 orders are the opposite versions of stop-limit and stop-market orders and are used to take profit once a specified price is reached. Take profit limit orders are meant to be used if you expect a longer, more ongoing movement in the preferred direction. The take profit market is mostly used when you want to take profit on spikes, for example. Day traders use the market option to ensure their order is filled; swing traders might prefer the limit option.
Order book
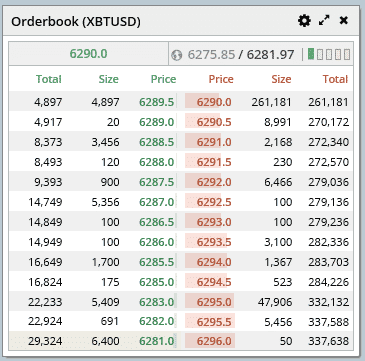
This board shows you the current open orders, including short and long orders.
Depth chart
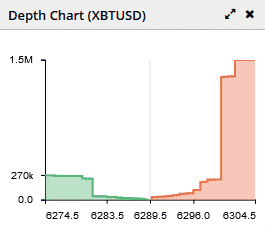
This is the graphic version of the order books. Basically, the buy/sell walls we know from other exchanges as well. Read more about them in this post about how to read buy/sell walls.
Chart
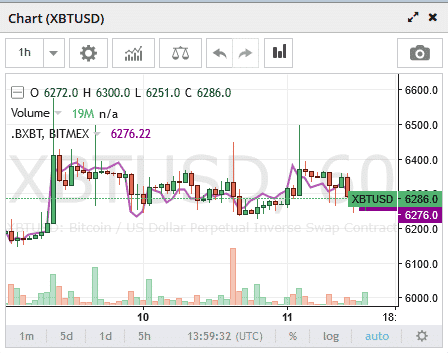
This is the chart you can use to set up your trading strategies.
Open position
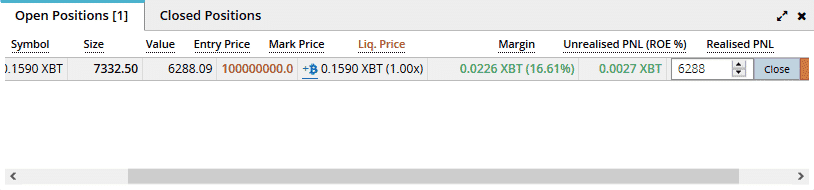
The symbol is the product of your position. Size is the amount of money you put in your position.
The value indicates the worth of your position. The entry price tells you when your order is filled.
Mark price is the last price of the product of your position.
The liquidation price indicates the price at which your position will be liquidated by the exchange.
Margin is your position after you use leverage.
Unrealized PNL (profit and loss) is what your position has gained/lost right now if you would close it down at this very moment. Unrealized PNL is the amount of gain/loss that the exchange realizes. Unlike unrealized PNL.
Realized P&L is the actual profit and loss after you close your position; it shows how much you made or lost on the current trade with this instrument, and also shows earnings from the funding rate, for example.
Open order
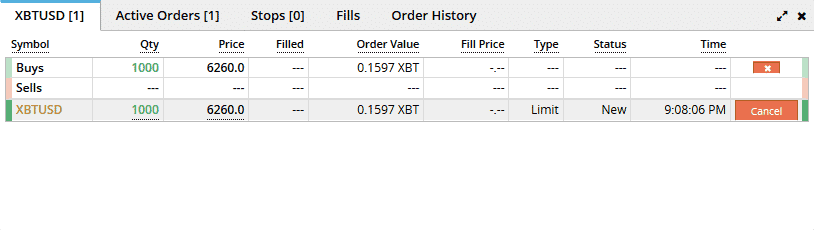
This is where you can see your open order(s). Let’s explore the terms. The symbol still the same as above. Quantity equals Size on the open-position board. Filled shows the number of contracts that have been bought. The order value is the same as Size in the open position board. Fill price is the price at which your position is filled. It can be varied due to market volatility. Type displays the order types. Status displays the current condition of your order. Time shows when you placed the order.
Recent trades
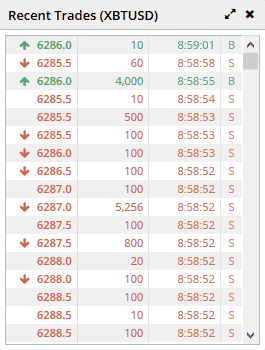
This board shows the latest trades, including the long and short orders. Green order indicates the long (buy) position, and vice versa.
Instruments

You can check which BitMEX product you are using. If you see a perpetual contract, it is likely to be your best option. If you take a time-based contract, it will expire at some point and close your position automatically when the instrument is closed and replaced. Perpetual contracts will never expire, even if your position is one year old.
Margin
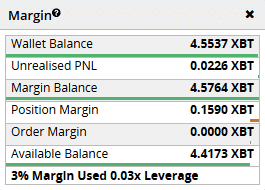
This board shows your wallet balance (the amount of BTC you have), unrealized P&L, and margin balance (the total of your wallet balance and unrealized P&L). The position margin is the amount of your position. The order margin is the amount of your open order. Available balance is remaining after deducting all your open orders and positions.
BitMEX Guide: Common Pitfalls
As advanced as Bitmex's interface is, there are some pitfalls new traders almost ALWAYS fall into. We want to protect you on that, so better read it and consider it when playing with the Mex.
- Laddering in does not work due to the liquidation price
So you get a trade signal with the instruction to ladder in at several price levels.— Paragraph break —You FOMO about not getting into the trade at the right time and buying at or near market price. From there, a liquidation price exists, and you cannot place orders for this instrument below the liquidation price anymore.— Paragraph break —It basically means you have to sit there and watch the price to go near liquidation to place the next ladder step, which can be very stressful.— Paragraph break —Hence, we have to pull this up from the other side. We place our limit orders from the lowest to the highest/deepest price.— Paragraph break —If you set up your buy orders first, you will create an average price for each ladder step reached, so the liquidation price becomes less relevant to the orders you placed.— Paragraph break —Conclusion: If you want to ladder into a trade, start with the lowest/highest order, and work down/up from there in the direction of the entry price.
Instead of Stop-Loss, you find yourself in a new trade
- This happens if you don't use the dropdown for market/limit stops, since the “REDUCE ONLY” checkbox is pre-checked here.— Paragraph break —If it is not checked, the system can buy or sell more than your current position. Example: You are long with XBT for 10,000 contracts.— Paragraph break —Accidentally, you set your stop-loss 10% below your entry price, with 20,000 contracts. If “Reduce Only” is checked, you will still only sell the 10k contracts you had. If it is unchecked, you will sell 20k contracts, which means you take the loss on the 10k-contract trade, while a new 10k-contract short position is activated.— Paragraph break —This is especially annoying if you are stopped out by a huge wick and the price action returns to normal afterward – it basically could double your loss.— Paragraph break —Example: You are long from 6,5k with 10k contracts. You set your stop loss at 6.4k accidentally with 10k contracts.— Paragraph break —The stop loss is basically a short as you are selling your long contracts for the same amount of short contracts. If you type in 20k by accident or place another 10k order by being confused without reducing the mess, it is real: A huge wick appears down to 6.4k- sells your 10k long contracts against the shorts AND buys 10k shorts on top. This is the ultimate bad situation: you get stopped out by the wick AND have new short contracts, even though it was just a wick and the price lifts up quickly again. UGH!
A cross-trade eats all your balance
- The leverage option provides a range from Cross to 100x; if you trade on CROSS, the leverage adjusts in real time and is not fixed. This means the trade can get fed by your account – even if this money is not in the trade yet. This option is super useful when trying to achieve certain things, but for most traders, across trade will kill their account. If you check the BitMEX calculator, you can indeed calculate cross positions that cannot be liquidated, so it is a nice tool – but you have to use it smartly and with a plan.
- Multiple orders due to “System overload” If you do a clicky-clicky-clicky thing once the BitMEX system is overloaded, you might find many orders on your account. Be careful, and don't Fomo. On fast price action, your whole account balance might find itself in one trade very quickly. System Overload = take a step back until it settles.
Bitmex Maintenance and Ending Contracts
- If a Bitmex Maintenance is announced, be sure to get out of your positions before. Even if it is an isolated trade, it has been reported that BitMEX can take funds from your actual secured funds if the stop-loss is exceeded during maintenance. Also, if a futures contract is not perpetual and therefore has a date on which it is replaced with a new one, be careful! Your position will be auto-closed once the date has hit.
- Price is in Bitcoin
You can lose track of your money pretty fast as everything is calculated in Bitcoin. Check our post about Bitmex Calculators to learn more about it. - Do you want
- The Psyche
Bitmex can not only rekt your account but also your Psyche. Check our Bitmex Test to evaluate yourself and our Smart Memo Method to prepare your mind for trading.
Common Questions
Why did my stop-loss not work?
If you wonder why your stop-loss did not work, it might be because you used a limit order instead of a market order. The price action, especially with XBT, is pretty fast sometimes. We recommend using stop-loss only with Market orders, even if the price is much higher in terms of fees – this is not the place to be cheap.
How to convert XBT to USD for clarity. BitMEX doesn't natively offer this, but external scripts can help. Ensure scripts are safe. Use browser extensions like Tampermonkey or Greasemonkey for setup. Always validate external code for security.
BitMEX Guide: Conclusion
BitMEX remains one of the most advanced cryptocurrency trading platforms, but it is not designed for beginners. Before trading with leverage, make sure you understand position sizing, risk management, stop losses, and liquidation mechanics.
If you are new to trading, consider practicing on the BitMEX Testnet before risking real funds. Start with low leverage and focus on consistency rather than chasing large profits.
This guide covers the core concepts of BitMEX trading. As the platform continues to evolve, always review the latest BitMEX documentation and platform updates before placing trades. For additional education, you can also explore our BitMEX signals groups reviews, trading guides, and Telegram crypto signal groups comparisons.